Deploy the server.
The lab starts here. This module walks the decisions that shape a Portainer Management Server deployment (runtime choice, storage, dedicated vs shared, the initial admin flow) and gives you the install commands for each runtime directly. These commands are pinned to the current LTS line; if you are running an older or specifically-versioned install, adjust the image tag accordingly.
Sizing and requirements
The Portainer Management Server is deliberately lightweight because it is a control plane, not a data plane. Real production installations sit comfortably on modest resources for anything up to a couple of hundred endpoints; the biggest driver of resource consumption is agent poll frequency and snapshot volume, not user activity.
For a lab install, 1 CPU and 4 GB RAM is plenty; the minimum recommended disk is 60 GB SSD, sized to hold backups and the image cache. You also need a network interface the server can reach the agents on (or the agents can reach the server on, for edge). For a small production install of up to 50 endpoints, plan for 2 CPU, 8 GB RAM, and the same 60 GB disk on NVMe. Once you get into the thousands of environments, 4 CPU, 16 GB RAM, and 120 GB NVMe is the recommended shape. The certified maximum today is 150,000 devices, which needs 8 CPU, 32 GB RAM, and 150 GB NVMe. NVMe latency matters more than raw capacity above the lab shape, and the datastore is the thing that grows over time, not the running process.
Detailed sizing guidance per fleet size, including the reference architecture recommendations (Ch2-D-04 in the Portainer Enterprise Reference Architecture), lives in the reference architecture document; treat the numbers above as a lab-friendly baseline, not a production recommendation.
Pick one of your four VMs as the Portainer Management Server. Give it a stable hostname you can reach from the other VMs (either DNS or a reservation-based IP), open the ports you need on its firewall (9443 for HTTPS, 8000 for the edge tunnel if you plan to use edge later), and get it into a state where you can install KubeSolo on it. KubeSolo is Portainer's own single-node Kubernetes distribution and is the recommended setup for the Management Server (Module 11 explains why: add-ons are Kubernetes-only). The rest of Module 4 uses that VM.
Runtime choice for the Management Server
Portainer runs on Kubernetes, Docker Standalone, or Docker Swarm. All three are supported, but the recommendation is Kubernetes; the other two are provided for cases where the existing operating model is Docker or Swarm and you are not yet ready to move.
Kubernetes (recommended) is the default answer for new deployments. Portainer installs as a Helm release; you get scheduler-managed restart, PVC-backed persistent storage, ingress for the UI, backups to S3 or Azure Blob against your existing Kubernetes IAM, and the setup needed to install add-ons. Add-ons like Portainer-Run are Kubernetes-only, and add-ons are how Portainer extends over time; running the server on Docker leaves that extensibility on the table.
Kubernetes on a single VM: use KubeSolo. Not every environment justifies a multi-node cluster for the Management Server, and standing up a full Kubernetes distribution just to host Portainer is often overkill. KubeSolo is Portainer's own lightweight single-node Kubernetes; it gives you the same Kubernetes setup (and therefore the same add-on capability) on one VM, without the multi-node operational overhead. For small production installs and for most lab work, KubeSolo is the correct answer.
Docker Standalone (legacy) is supported if you already run Docker as your operating model and are not yet moving to Kubernetes. One VM, Docker installed, one container. The downside is single-host with no scheduler-managed recovery (unless you wire up systemd or Docker's own restart policies), and the more significant downside is that add-ons cannot install on a Docker Standalone Management Server, so the deployment cannot grow into Portainer's extension model without a setup change later.
Docker Swarm (legacy) is supported if you have an existing Swarm operating model. You get scheduler-managed restart across a cluster of Docker hosts, but not active-active (Portainer is still single-writer BoltDB; see Module 3), and the same add-on constraint applies. Useful when you already run Swarm; not a reason to introduce Swarm.
Persistent storage
Everything the Portainer server needs to remember lives in the --data directory: the BoltDB, TLS material, backup archives, an embedded Prometheus TSDB subdirectory, and a few other bits of file state. Persist that directory across restarts or you lose everything.
On Kubernetes, this is a PersistentVolumeClaim, and the CSI driver providing it needs to support ReadWriteOnce and survive pod rescheduling. On KubeSolo, the same PVC model applies against KubeSolo's default storage class, backed by the local disk on the VM (durable, but not portable off that host without your own arrangement). On Docker Standalone, this is a bind mount or a named volume. On Docker Swarm, it is a named volume with a driver that can survive a node move, or a bind mount to shared storage the swarm nodes all have; the specifics depend on what shared storage your environment has.
Because Portainer is single-writer, the storage does not need to be simultaneously mounted across nodes; it needs to be durable, and it needs to be re-mountable on whichever node Portainer restarts on. A local disk on one node satisfies durability but not the re-mountability requirement; the pod cannot move. Shared block storage (an EBS volume you can detach and reattach, an Azure disk, a Longhorn volume, a Ceph RBD) satisfies both.
You can also enable datastore-at-rest encryption. Point --secret-key-name at a key file, and Portainer encrypts the BoltDB on write. If the key file goes missing between boots, the store will not open, and the error is clear enough to distinguish from a migration failure.
Dedicated vs shared management environment
A design decision to make early: does Portainer run on a dedicated management cluster, or does it share the cluster with the workloads it manages?
Dedicated is the reference-architecture recommendation for any real production install. A small Kubernetes cluster (or a couple of Docker hosts) whose only job is to run the management plane: Portainer, its backup targets, whatever supporting infrastructure lives with it. The workload clusters are separate; Portainer manages them as endpoints. This isolates the blast radius; a workload cluster having a bad day cannot take Portainer with it, and vice versa.
Shared (Portainer running on the same cluster it manages) is legitimate for small deployments where the operational overhead of a separate management cluster is not worth it. The tradeoff is that you have to be careful about how you deploy Portainer's own workload (dedicated node pool, resource requests that survive contention, priority class) so that it does not compete with the workloads it manages. In a lab you can share; in a real production environment, default to dedicated.
For lab purposes, one VM running KubeSolo with Portainer on it is fine; you do not need a management cluster to learn the product, and KubeSolo gives you the Kubernetes setup without the multi-node overhead. The point of this chapter is that when you move into a real deployment, this decision comes early and it is worth doing right.
Deploying on Kubernetes (recommended)
The Kubernetes install is a Helm chart, updated in step with the release line. On a managed Kubernetes cluster (AKS, EKS, GKE, ROKS) you get PVCs backed by the cloud provider's default storage class, ingress through whatever ingress controller you have installed, and (usually) a working out-of-the-box result. On a self-managed cluster (RKE2, k3s, kubeadm, Talos) you get the same chart; you provide your own StorageClass and ingress.
Add the chart repo (Helm v3.2 or later, for --create-namespace support):
helm repo add portainer https://portainer.github.io/k8s/
helm repo update
Then run the install, picking the variant that matches how you plan to expose the UI.
NodePort (Portainer available on port 30779 for HTTPS):
helm upgrade --install --create-namespace -n portainer portainer portainer/portainer \
    --set enterpriseEdition.enabled=true \
    --set enterpriseEdition.image.tag=lts \
    --set tls.force=true
Ingress (replace the ingress class and hostname with your own):
helm upgrade --install --create-namespace -n portainer portainer portainer/portainer \
    --set enterpriseEdition.enabled=true \
    --set enterpriseEdition.image.tag=lts \
    --set service.type=ClusterIP \
    --set tls.force=true \
    --set ingress.enabled=true \
    --set ingress.ingressClassName=nginx \
    --set ingress.annotations."nginx\.ingress\.kubernetes\.io/backend-protocol"=HTTPS \
    --set ingress.hosts[0].host=portainer.example.io \
    --set ingress.hosts[0].paths[0].path="/"
Load Balancer (Portainer available on the assigned LB IP, port 9443 for HTTPS):
helm upgrade --install --create-namespace -n portainer portainer portainer/portainer \
    --set service.type=LoadBalancer \
    --set enterpriseEdition.enabled=true \
    --set enterpriseEdition.image.tag=lts \
    --set tls.force=true
Each generates a self-signed certificate by default; if you need HTTP access instead, drop the tls.force=true line (NodePort exposes it on 30777, Load Balancer on 9000).
The Helm values you will typically touch beyond the exposure method: persistence configuration (storage class, size); and any environment variables you want to bake in at boot (feature flags, log level, base URL if the server is served under a sub-path, trusted origins).
On Kubernetes you also get PodSecurity to think about; Portainer's default chart values are meant to work under the Restricted PodSecurity Standard, but if your cluster runs a stricter admission profile you may need to tune the pod spec. If the pod cannot start, look at the events on the pod first, not the container logs; the failure is usually at admission, not at runtime.
For further details on deploying on Kubernetes, see the Portainer documentation.
On a single VM: KubeSolo
If a full Kubernetes cluster is overkill for your Management Server (small production install, lab, edge management node, small-scale deployment), use KubeSolo. It is Portainer's own lightweight single-node Kubernetes; you get the Kubernetes setup (and therefore add-on capability) on one VM without standing up a distribution. Install it directly on the target VM:
curl -sfL https://get.kubesolo.io | sudo sh -Watch it come up via the systemd service logs:
# on Debian-based systems
journalctl -u kubesolo -f
The install writes an admin kubeconfig to /var/lib/kubesolo/pki/admin/admin.kubeconfig. Point kubectl and helm at it, either temporarily for the current shell:
export KUBECONFIG=./admin.kubeconfigor merged permanently into your existing kubeconfig:
# merge and back up existing config
KUBECONFIG=~/.kube/config:./admin.kubeconfig kubectl config view --merge --flatten > /tmp/kubeconfig.merged
cp ~/.kube/config ~/.kube/config.bak
mv /tmp/kubeconfig.merged ~/.kube/config

# switch to the KubeSolo context
kubectl config use-context kubernetes-admin@kubesolo
From there, apply the Portainer Helm chart against the local KubeSolo cluster using whichever exposure command from above matches your plan (LoadBalancer is usually not available on a single VM outside a cloud environment, so NodePort or Ingress is the common choice here). The Helm values you touch are the same; the difference is storage class (KubeSolo's local-backed default) and ingress (KubeSolo's built-in ingress rather than one you install separately).
For further details on deploying on KubeSolo, see the KubeSolo documentation.
Install KubeSolo on your Management Server VM with the command above. Then install the Portainer Helm chart against that KubeSolo cluster using the NodePort command. Once you can browse to the HTTPS endpoint, come back to chapter 8.
Deploying on Docker Standalone (legacy)
Docker Standalone is supported if your operating model is Docker and you are not yet moving to Kubernetes. Add-ons will not install on a Docker Standalone Management Server; if extensibility matters (and for most deployments it will), plan a setup move later.
Create the data volume, then start the Portainer BE container:
docker volume create portainer_data
docker run -d -p 8000:8000 -p 9443:9443 --name portainer --restart=always -v /var/run/docker.sock:/var/run/docker.sock -v portainer_data:/data portainer/portainer-ee:lts
That mounts a persistent volume onto /data, publishes port 9443 for HTTPS, publishes port 8000 for the edge tunnel, and sets --restart=always (a reasonable lab default; production usually uses systemd or a supervision layer).
Once the container is running, browse to https://<your-vm>:9443. You will see a self-signed certificate warning on first boot; that is expected in a lab, and Module 5 covers replacing it with a real certificate. The first request is the beginning of the initial-admin flow; chapter 8 picks up there.
For further details on deploying on Docker, see the Portainer documentation.
Deploying on Docker Swarm (legacy)
Docker Swarm is supported if you already run Swarm as your operating model. Same add-on constraint as Standalone: Swarm cannot host add-ons, so extensibility requires a setup move later.
The Swarm install is a Docker Compose stack. Retrieve Portainer's reference stack file and deploy it:
curl -L https://downloads.portainer.io/ee-lts/portainer-agent-stack.yml -o portainer-agent-stack.yml
docker stack deploy -c portainer-agent-stack.yml portainer
The stack is a single Portainer service pinned to a manager node with a placement constraint, a named volume for /data, and published ports for 9443 and 8000.
Swarm requires you to think about which node Portainer runs on, because Portainer's state (the BoltDB) lives on whatever host the container schedules to. If you pin Portainer to a specific manager and that manager fails, Portainer will not restart on another node unless the persistent volume can follow. Either accept the constraint (Portainer stays on that manager, restart it manually if the host fails), or arrange for the storage to be sharable across the swarm.
A three-manager Swarm is the practical minimum for anything you would call production; a single-manager Swarm is a Standalone install with extra ceremony. If you are running a single-manager Swarm, you should probably be running Standalone; if you are running three managers, the constraint above matters, and picking the right node with the right storage matters.
For further details on deploying on Docker Swarm, see the Portainer documentation.
Initial admin and the five-minute window
The first request to a fresh Portainer server puts you in the initial-admin flow. Portainer generates a setup token at boot and writes it to the container logs, and the interactive flow expects you to submit it along with the first administrator account within a bounded window (five minutes by default). Retrieve it on Kubernetes with:
kubectl logs <pod> -n portaineror on Docker with:
docker logs <container>It's printed near the top of the boot output. Take longer than five minutes and Portainer refuses the setup ("the setup token expired"); restart the container to get a fresh token and window.
This is deliberate: reachability alone should not be enough to become admin. Requiring the token means whoever completes setup also needs access to the logs, a real barrier against someone who has only stumbled onto the exposed HTTPS port, and five minutes is enough for a human working from a terminal but too short for the server to sit exploitable for hours.
You can automate the initial-admin creation with --admin-password or --admin-password-file (mutually exclusive; setting both fails validation at boot); either bypasses the token flow entirely. To keep the token step but control its value yourself, rather than reading a generated one out of the logs, set it with --setup-token - useful for an IaC pipeline that needs to complete setup without a human reading logs. For a lab, reading the token from the logs is fine; for production, prefer the flags so the deployment is idempotent.
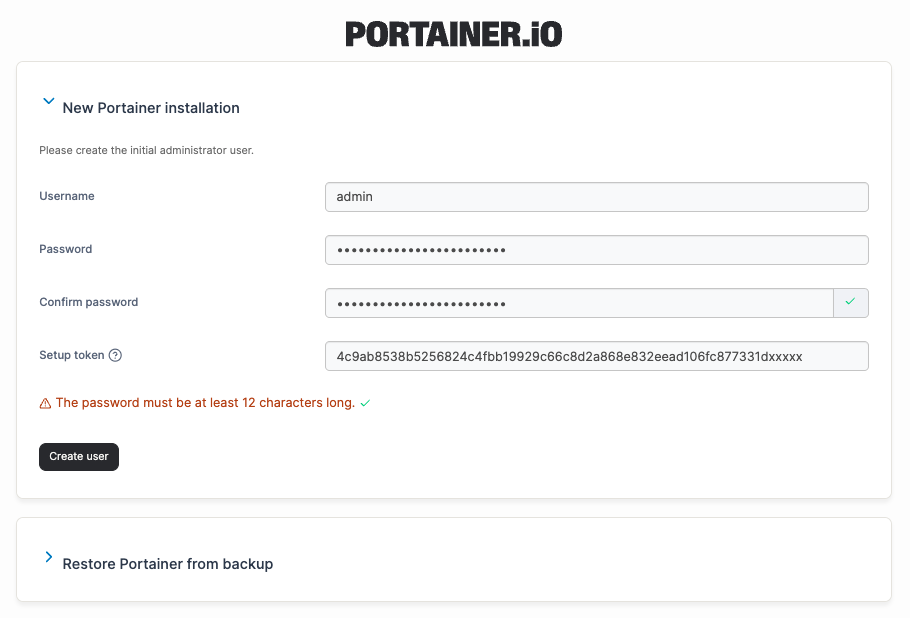
The initial administrator is always user ID 1, and user ID 1 is always allowed to log in with local (internal) authentication regardless of what auth method you configure later. That is your escape hatch when LDAP or OAuth is misconfigured (Module 5 covers this). Losing that password locks you out; take it seriously.
For further details on the setup token and the five-minute window, see the Portainer documentation.
Adding your license
Portainer Business needs a license. Add it either at boot with --license-key (or the PORTAINER_LICENSE_KEY environment variable), or through the UI after the initial admin exists.
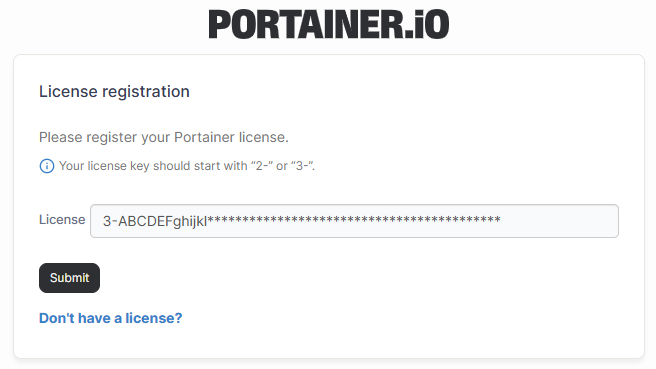
Licenses are managed by liblicense v3. Adding one parses and validates it locally (an expired or revoked key fails immediately with a clear error), then checks in with the remote licensing server. A network-failed check-in is tolerated ("network connection failed" gets logged, not fatal); this is the deliberate air-gap-friendly path. Multiple licenses can stack: subscription licenses stack with subscription licenses, and V2 Free stacks with V2 Subscription; other combinations conflict, and adding one that conflicts asks you to remove or force-replace the conflicts.
What licenses do (and do not do) matters for Module 12. A missing or expired license does not stop Portainer from running; it stops non-admin users from logging in with a 403 "License is not valid," and it stops new environment provisioning for free-tier overuse. Administrators can always log in, on the theory that administrators need to be able to fix the license problem. This is the safety valve that keeps you unblocked when a license expires unexpectedly.
For further details on adding and managing your license, see the Portainer documentation.
If you have a Portainer Business trial or partner license, add it now through the UI (Settings → Licenses). If you do not have one yet, Portainer Business Edition offers a free three-node tier that you can use for the rest of this course; you will hit the node limit when you get to Module 6 and start onboarding environments, but it will get you through Modules 4 and 5.
Set up Edge Compute
Right after the license screen, the initial-setup flow puts you on a "Set up Edge Compute" step, before the Environment Wizard ever launches. It is one screen with a toggle and a couple of fields; click Enable and continue to turn Edge Compute on now, or Skip to leave it off and configure it later from Settings → Edge Compute (chapter's contents are the same either way, only the timing differs).
Two fields matter if you enable it here: the Portainer API server URL (the address edge agents will reach the server on) and the Portainer tunnel server address (the same host, port 8000 by default, for reverse-tunnel mode). Both can be overridden per agent at deploy time, but the values you set here become the default baked into every edge key Module 6's onboarding chapters generate.
The third field, Enable Edge Environment Waiting Room, decides whether a new edge device is held for an admin to approve or trusted automatically on first connect. Leave it on; Module 6 covers the trust flow it governs.
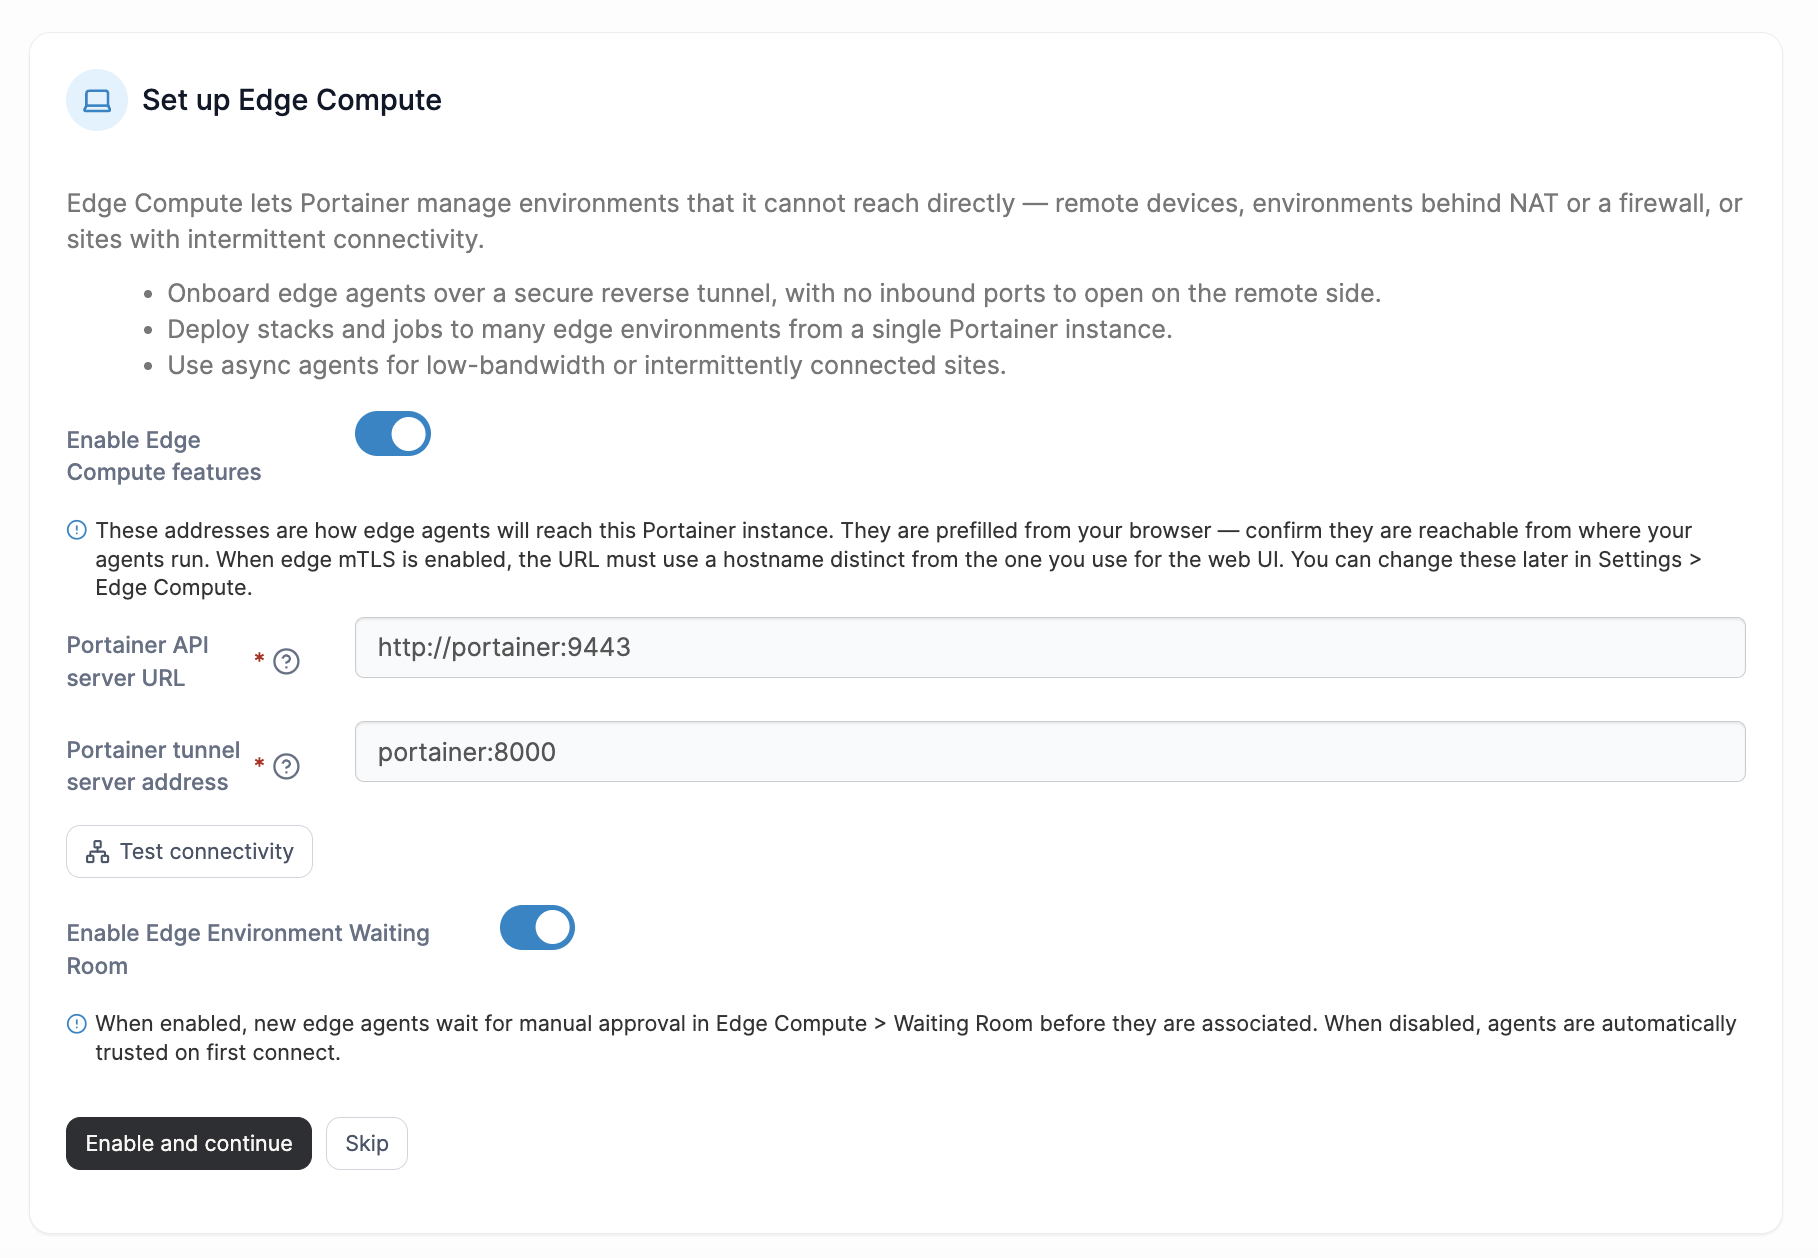
Skipping here is not a dead end; nothing about it is one-way. Everything on this screen lives at Settings → Edge Compute afterward, so if you skip now and decide later that you need edge, go configure it there before Module 6.
For further details on configuring Edge Compute, see the Portainer documentation.
Enable Edge Compute now rather than skipping it, even though you will not onboard an edge environment until Module 6. Set the Portainer API server URL and tunnel server address to values reachable from wherever your edge VM will live (your Management Server's hostname or IP works fine in a single-network lab), and leave the Waiting Room enabled.
What is next
You now have a Portainer Management Server running, an administrator you can log in as, and a license. Module 5 is about configuring it for enterprise use before you point any real environments at it.
Next: Module 5 · Configure for the enterprise